So, you’re about to start planning an online course for a school.
The most important thing is – where to start? Your students may come from different time zones, they have various learning styles, and prefer their own routines.
On top of that, you need to plan how to encourage collaboration among students, create a timeline, and ensure constant progress. Needless to say, this task can be overwhelming in the beginning, so the best way to create the schedule is to map it out.
In this post, you’ll find five great tips to create a logical and learner-centered schedule.
1. Collect Student Suggestions
The best schedule is the one that works for your students. That’s why the first step in creating a schedule is to get some feedback.
This means asking your current students about:
- their past online school experience. This question should help you find out some details to use to adjust the timeline, assignments, check-in points, etc.
- current life responsibilities. Some students might be involved in other online classes or have other commitments or regular events affecting their availability
- their learning styles. Students have preferences when it comes to types of assignments, learning times, and other things.
Basically, try your best to collect as much information as possible. Each bit of student feedback can be helpful in creating a better course.
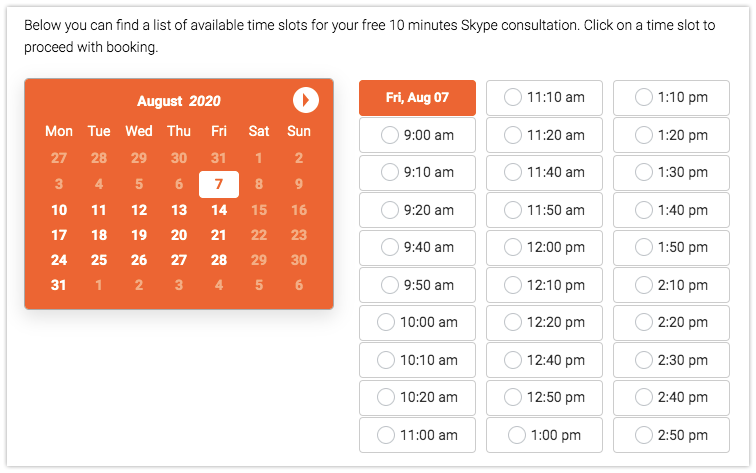
Pro tip: hold one-on-ones with students to get their honest feedback on the course. Add a WordPress booking plugin to your school’s website to allow them to make appointments to speak with you.
The booking feature is very simple – a student just needs to choose the time slot that works for them.
Source: Bookly
Having a plugin can also help you be more organized and productive. You can plan your day better and disable time slots where you need to focus on something else (so it’s impossible to choose them).
2. Ensure a Proper Course Introduction
The beginning of the course is a very important time that sets the tone for the entire student experience. That’s why it’s a good idea to make the first week of the course about introducing the students to it properly.
At this point, you might have a lot of feedback from students about how they prefer to learn. So, you can make the first week about sharing your vision of explaining how the course meets their preferences.
Here’s an example outline for a week 1:
- A complete and detailed overview of all activities in week 1
- A presentation of the school’s rules and codes
- Self-introduction by students
- A detailed overview and discussion of the entire course
- Meeting about discussing and following up on school rules and codes of conduct, etc.
Each activity in the outline is designed to provide a proper introduction to the course and make students more confident and comfortable with learning.
By explaining everything this way, you’re also showing that the school has done its own homework of making online education as comfortable and effective as possible.
3. Organize the Schedule for Maximum Engagement
In an online school, students work with the same course content, activities, and discussions within a week (or even throughout the entire course). This routine helps most of them to be organized and better prepared to complete their assignments.
But they actually work on assignments, activities, essays, and other tasks at times when they perceive to be the most convenient for them. This is how they manage their time to accomplish as much as they can, quickly.
Here are some ideas to make it easier for students to complete their assignments:
- Make all assignments due by the end of the week to give the students as much time as possible to prepare. Never assign tasks with daily due dates to avoid overwhelming the class.
- Plan at least one check-in point with each student every two weeks. This will help to prevent them from feeling being left on their own.
- Consider scheduling a weekly or bi-weekly review for each course you teach. It would be a meeting where you share your feedback on how to write an essay and have an opportunity to go over tasks completed by the students.
Pro tip: write a small preview for each check-in point and weekly review, so all students know what you’re going to be discussing.
If your school has an online booking calendar, allow students to book check-ins with you at the time that works for them.
4. Think About How to Promote Collaboration
Your course will have group discussions, and other tasks students need to complete together. Ensure that every week they have at least a few opportunities to engage with others via video and constantly – via text.
Make sure that the schedule has the students working on as many group activities as possible. For example, one week may feature the following activities:
- Brainstorming sessions to generate creative ideas and thoughts
- “Pair and share” sessions where two students need to work together to create a joint answer or presentation
- “Teacher and student” sessions where you assign two roles to a pair of students. One is a student, and another one is a teacher whose task is to explain the concepts from the lesson
- Peer review. “Have students go through an essay or a research paper written by others,” recommends Diana Adjadj, an educational writer at BestEssaysEducation. Instruct them to outline the strengths, problems, and recommendations for the writers.
Pro tip: allow your students to choose their teammates for discussion and group assignments. This would be a great choice to have for those with common interests and compatible learning schedules.
5. Schedule Regular Breaks
Online classes can’t provide the same level of engagement as in-person classes. That’s why it might seem to be a good idea to have longer classes when teaching online. It’s not. Studies have shown that online students who had 50-minute study sessions had their performance affected severely.
Scheduling regular breaks is a must for helping students navigate classes and re-energize appropriately. It’s common advice, but it works. Taking a break during classes keeps the mind fresh and helps with avoiding burnout.
“So, how long should these breaks be, and how often?”
Excellent question. Breaks can do more harm than good if they’re unnecessarily long. It’s recommended to keep them no longer than 15 minutes and have one break every 30 minutes of studying.
A shorter study break gives just enough time to clear the mind without having the mind spin off to a dozen other things.
Important! The lunchtime is a break that could be a bit longer, say 20 minutes. This timeframe works in online education because the students don’t have to spend time going to the cafeteria and standing in line to get their meal.
Conclusion
Creating a schedule for an online school means considering a ton of other different things. To make the classes work for students, you need to listen to them and try to schedule everything in a way that makes learning as comfortable and simple as possible.
Hopefully, you have a much better idea of where to start planning after reading this. There’s no way to create a perfect schedule that works for each and every student. But with these strategies, you’ll be able to get pretty close.


